When iTax was introduced a few years back, I was very clueless about it and after lots of frustrations trying to understand how to do it, I ended up filing manual income tax returns.
Still reeling from the frustrations of the previous year, last year I paid someone to do it for me, but this year, I was determined to do it myself and to do it way earlier than June, so I got a friend to walk me through in April (thanks, Peter!) and discovered that it was a very simple process.
They say that the best way to get a lesson to stick, is to teach someone what you've been taught, and I have found this to be true these last few days while showing people how to manoeuvre the iTax system, and in the process, I have also learnt a lot.
I'm writing this post to be able to share what I have learnt and also as a point of reference for the coming years (sometimes memory fails me). This is in reference to filing income tax returns for 2015 in 2016, but it applies whichever year you need to use this guide. So without further ado, let me take you through the process of filing your income tax returns on the iTax system, with a bias on employed, unemployed/students and Kenyans who live abroad. Then I'll handle the FAQs in another blog post. Here we go:
Please note that all Kenyans over 18 are supposed to have a KRA PIN and are supposed to file returns every year, whether they have a job or not (yes, even students must file (nil) returns.) If you fail to file returns, or file them late (after the 30th June deadline), you will be fined Sh10, 000 or 25% of the tax due, whichever figure is higher.
THINGS YOU NEED
If you are currently
employed, you need:
- P9 form – get this from the payroll/accounts department of the employer whom you were working for in 2015. If you had more than one employer in 2015, get the P9 forms from all the employers you were working for in 2015. If you are jobless, but you were working last year, get this from your 2015 employer.
- KRA PIN number – find it on your pay slip or ask your payroll accountant to tell you or get it from KRA by sending a scanned copy of your national ID and requesting for your PIN number. You can reach KRA through their iTax centres around the country, through Huduma Centres around the country, on Facebook or via email callcentre@kra.go.ke or telephone (020) 4999 999, 0711099 999.
- iTax website https://itax.kra.go.ke/
If you are unemployed
and were still unemployed in 2015, you need:
- KRA PIN number – find it on your pay slips from your former job or get it from KRA by sending them a scanned copy of your ID and requesting for your PIN number.
- iTax website https://itax.kra.go.ke/
If you were not
living/working in Kenya in 2015, you need:
- KRA PIN number – find it on your pay slips from your former job in Kenya or get it from KRA by sending them a scanned copy of your national (Kenyan) ID and requesting for your PIN number.
- iTax website https://itax.kra.go.ke/
STEP 1
Go to the iTax website https://itax.kra.go.ke/ and log in (Enter your PIN number and click
continue, enter your password, do the calculation and get the correct answer
and enter it in the relevant space [security stamp] then click log in). If you can’t remember your password, click on “forgot
password/unlock account” and check your email for the new password.

STEP 2
Once you log in,
this is the page you will get.
If you were unemployed for
the entire 2015 (January to December) click on “returns” on the red menu bar (circled in yellow) and choose the
fifth option “File NIL return”. Fill
in the dates: from 01/01/2015 to 31/12/2015 and the other relevant info except
“wife PIN” (unless you are also filing returns for your wife), then click
submit. You are done. Wait for next year to file nil returns again if you still
remain unemployed the whole of 2016. If you get a job, even for a few months, you’ll
need to file returns next year.
If you were not living/working in Kenya for
the entire 2015, also file
nil returns, just like the people who were unemployed.
If you were employed in 2015, whether for a few months or the full year,
click on returns on the red menu bar (circled in yellow) and choose the first
option which is “file returns”
If you have already
filed 2015 returns, but you need to change something, click on returns on the
red menu bar (circled in yellow) and choose the third option which is “file amended return”.

STEP 3
KRA has already filled the first two options for
you, so just click on the drop down arrow on the third option “tax obligation” and choose the relevant
choice. For most people that is the first option “Income tax – resident individual”. Click next.
Income tax – rent income option is for
landlords who are paying tax on rent collected.

STEP 4
Download the Excel
spreadsheet by clicking on it, it will open as a ZIP file. Double-click on the Excel spreadsheet inside the ZIP file
to open it. Keep your P9 form at
hand because you will need to fill the information on it on the Excel spreadsheet.


STEP
5
First things first, click on “enable
content” on the yellow line at the top of the Excel sheet, so you can be
able to fill in the form.
At the bottom, you’ll notice that there are six Excel
sheets and the first one is the one you are on right now. It is called “basic info”. Fill in all the relevant
details and scroll down to fill in the rest of the details if you have a landlord and if
you have a tenant and if you are an auditor (most people don’t need/choose not to fill
these landlord/tenant/auditor details).
Please note that for every field you
choose yes, a new sheet will appear at the bottom of the Excel sheet requiring
you to give more details. You can only fill in the parts that are white and not
the charcoal gray parts. Be sure to fill in every field marked with a red asterisk (*). When
you are done with the “basic info”
sheet, move on to the next sheet titled “F_Employment
Income”.


STEP
6
Keep your P9 form close. You need it to fill in the gaps on this sheet
titled “F_Employment Income”. Fill
in the PIN and name of your employer from your P9 form. Under “gross pay” write the figure you find
at the bottom of “COLUMN D” in your
P9 form. Most people don’t have allowances and benefits, net value of housing
or pension in excess of 300, 000, so fill in zero (0) in those boxes and move
to the next sheet titled “Details of
PAYE Deducted”
If you had more than one employer in 2015, you'll have more than one P9 form (get them from the respective former employers, payroll department). Include the details from each employer in separate rows (You can add as many rows as the number of employers you had in 2015 and fill in the relevant details using the relevant P9 forms).


Please note that when you are filling the Excel sheets, you cannot "cut and paste" you have to fill in manually.

STEP
7
You still need to use your P9 form, so keep it close.
Open the sheet
titled “Details of PAYE deducted”.
This is the third sheet on the Excel spreadsheet.
- Fill in the name of employer from your P9 form and the employer’s PIN number still from the P9 form.
- Fill in taxable salary from the total figure you get under COLUMN H of your P9 form.
- Fill in Taxable pay on taxable salary from the total figure you get in COLUMN J of the P9 form.
- Fill in amount of tax deducted (PAYE) from the total figure you get on COLUMN L of the P9 form.
Skip the next
two sheets i.e. Skip “Advance tax credits”
and “IT payments credits” and go to
the last sheet titled “Tax computation”.
NB: You only need to fill “Advance
tax credits” if you have a commercial vehicle and you only need to fill “IT payments credits” if you paid tax in
advance, which most people don’t do.


STEP 8
Still use your P9 form.
Open the last sheet
titled “Tax computation”.
You only
need to fill two spaces: “defined/pension
contribution” and “personal relief”.
- For defined/pension contribution, fill in the figure you find under COLUMN e2 on your P9 form.
- For personal relief, for most people it is 13, 944 (which is 1162 multiplied by 12 months), so fill in 13, 944.
- If you worked for less than 12 months in 2015, take the figure you find under “personal relief” COLUMN K on the P9 form and multiply it by the number of months you worked i.e 1162 multiplied by the number of months worked, then fill in the answer you get under “personal relief” on the Excel sheet.


Once you
are done filling in the two fields, scroll down and click “validate”.

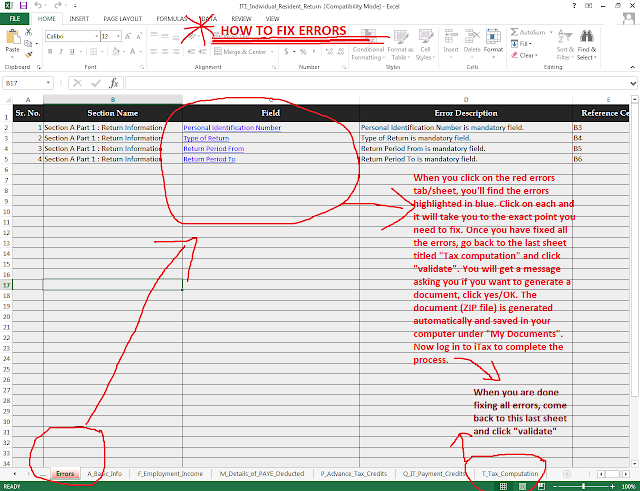
If there are errors,
you will get an alert. At the bottom of the Excel sheet on your extreme left,
click on the red tab with the title “errors”.
It will show you the errors, click on each and give the correct information,
then when you are done fixing all the errors, go back to the last sheet titled
“tax computation” and click “validate” again. You will get a message
asking you if you want to generate a document. Click “yes”. The document (ZIP file) generates automatically and is saved
on your computer under My Documents.

STEP
9
To finish, go back to the iTax website and log in again https://itax.kra.go.ke/,
click “returns” >> file return >> fill the required
info. The required info is: Type
of return, return period 01/01/2015 to 31/12/2015, and then click on browse >> My Documents >> select the ZIP
file you see ending in
_ITR. Click open to upload onto the iTax system. Agree to the terms and conditions, then scroll down
and click “submit”


STEP 10
Check your email for a notification from KRA, it is sent almost
immediately. If the figure in the attached acknowledgment receipt is negative,
KRA owes you (they'll pay you when they feel like, like after five years.
They'll deposit the cash directly into your bank account, which you already
filled in their form). If the figure is positive, you owe KRA. Pay them without
delay.

Congratulations! You are done! Let’s do this again next year.
Remember you can file your returns for 2016 as early as January 2017, you don't have to wait till June (the last minute!)
NB: IF YOU REALISE YOU MADE A MISTAKE AFTER YOU HAVE ALREADY FILED YOUR RETURNS, YOU CAN AMEND/MAKE CHANGES/EDIT >>>:
If after you finish filing your
returns, you realise you made a mistake, worry not, you can change it, but do
so before the 30th June deadline.
To amend your return, repeat the same process, log in to iTax >> click on “returns” >> then “file
amended return”.

Select the tax obligation “Income tax – Resident individual”.

On the next page that opens,
select return period “from
01/01/2015 to 31/01/2015”.
On “type of form to download” select “Excel” then click on download. You will be asked if you want to
download the form for amendment, say OK. The
Excel file you had filled in will download.
Double click on it to open it.


Click on “enable content” on the yellow line you see at the top. Then click
on “amendment” at the bottom left of
the page. You’ll get the Excel sheets with all the information you had already
filled in; all you need to do is to change whatever you are changing, then go
to the last sheet titled “Tax
Computation” and click “validate”.
If there are errors, fix them and click “validate” again. Once you validate, you
will be asked if you want to download a document (just like in STEP 8), say yes/OK and the document will
automatically save in your computer on My
Documents.


Go back to the open amendment
page on iTax and click on browse >>
My Documents >> and select the new ZIP file (check on the
time stamp on the right of the ZIP file to make sure it is the latest i.e. the
amended form). Click “open” to
upload, then click “submit”. You’re
done amending.


And that's it! You're done amending.


